Remove the bar top parts from the box and lay them out on your work bench to familiarize yourself with how they go together. Prepare the tools needed to complete the job; a drill, drill bits and countersink, 1-1/4” x #6 or #8 wood screws, wood glue, bar and C clamps and a clean damp cloth. Determine if you want to cut and fit all the planks first or cut, fit and install each plank as you go; whatever way is easier for you.
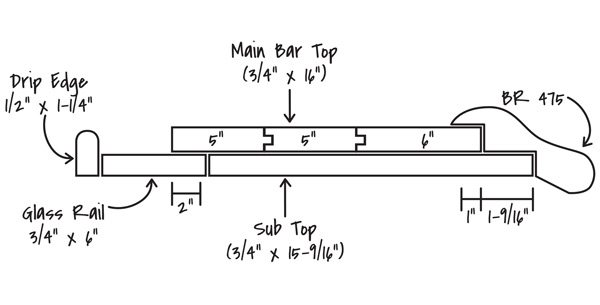
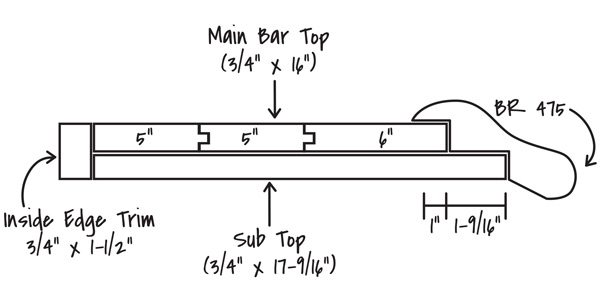
Next, miter and or cut to size the 6” wide plank and place it 1-9/16” from the front edge of the bar top using C clamps to hold it in place. Trace the perimeter of this plank with a pencil and remove it. Then drill and counter sink holes through the plywood sub top in a zigzag pattern about ¾” inside your pencil mark, remove any wood chips or debris from the sub top and install this plank using 1-1/4” x #6 or #8 wood screws only (NO GLUE).
Cut to length and or miter the 5” wide center plank, tap it into place to check fitment and repeat the drilling process described above. When installing this plank run a small bead of wood glue on top of the tongue only and tap it back into place with a rubber mallet or hammer. Use a small bar clamp across the planks to draw tight any gaps in the seam and install using 1-1/4” x #6 or #8 wood screws as previously described.
Now you are ready to install the third plank and optional fourth plank – if required – by repeating the same process. Once you have done this use the clean damp cloth to remove the excess glue and let it dry several hours. When the glue is dry, sand clean with a random orbit or vibrating sander to remove excess glue finger prints and debris.
You are now ready to install your bar rail molding, inside edge trim or glass rail and drip edge and begin to finish the wood bar top. Please refer to our “How to finish your bar rail molding” for tips on finishing.
It is also possible to attach the bar top planks from the top by counter sinking screws in the planks and installing matching wood plugs over the screw heads. (click on images to enlarge)
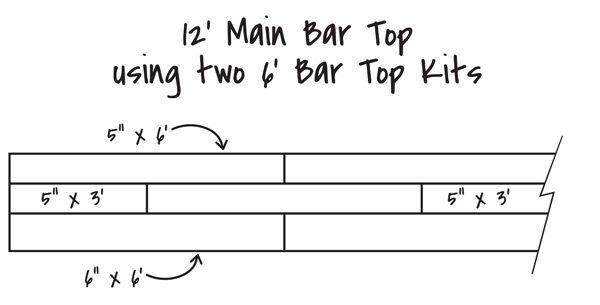
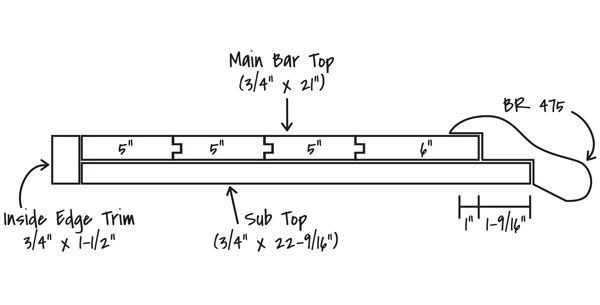
If making a 10’ or longer bar top, use multiple kit combinations to achieve the required length by alternating the joints of the planks as shown below. You can use bisquet joints in the ends of the planks where they meet as an option. For customers requiring a wider main bar top or for those not using the glass rail and drip edge option, we offer our main bar top kits with an extra 5” wide plank for a 21” width as shown below. (click on images to enlarge)
Save
Save
OFFER EXCLUDES: TAXES, SHIPPING, WALL BARS, and CLOSEOUTS & SPECIALS. OFFER VALID AT TIME OF PURCHASE ONLY.
Offer Valid
November 10, 2025
thru November 30, 2025
Use Code: NOV10OFF
OFFER EXCLUDES: TAXES, SHIPPING, WALL BARS, and CLOSEOUTS & SPECIALS. OFFER VALID AT TIME OF PURCHASE ONLY.
4 Responses
Why do you not recommend using wood glue to attach the planks to to the sub top?
The solid wood main bar top is NOT glued to the sub-top to allow for expansion. Use screws only and drill a slightly larger hole than the diameter of the screw. I will respond directly to your email as well.
Thank you for considering Hardwoods Incorporated – The Hardwoods Team.
What is the best methd used to attach the completed bar top assembly to the base cabinet.
Once the main bar top kit is installed onto the plywood sub top, the entire assembly can be attached to base cabinets or bar wall with wood screws from underneath. Small angle brackets or continuous metal angles may also be used. Please contact us if you need assistance.